Pose2Sim Blender





Pose2Sim_Blender is a Blender add-on for visualizing Pose2Sim results and rigging your character with markerless kinematics.
It can be used to visualize:
- Camera positions, orientations, field of view, etc. (using a
.tomlcalibration file) - Videos, image sequences, or still images in the camera frame of reference
- Markers trajectories (from
.trcor.c3dfiles) - Skeletal OpenSim data (
.osimmodels,.motmotions, and.motforces) - And much more...
📝 Note:
- Pose2Sim is an open-source pipeline for obtaining research-grade 3D motion analysis from consumer-grade cameras (such as phones, webcams, GoPros, etc). Its main application fields are sports science, biomechanics, and animation.
- OpenSim is an open-source software for research in biomechanics, widely used in motion capture (MoCap).
- Blender is an open-source software used for 3D modeling, animation, and rendering.
❗ Important:
This project is completely free and open-source: it you like it and find it useful, please consider supporting it!
You can help make it more visible and sustainable by ⭐ Giving us a star ⭐ or ❤️ Becoming a sponsor. ❤️
❗ Important:
If you want to contribute to Sports2D or Pose2Sim, please see How to contribute or join the Discord community!
Installation
📝 Note:
For Blender < 4.4, see the old and tricky installation procedure here. I'd strongly suggest updating your Blender version instead.
-
Install Blender:
Download and install Blender -
Download the Pose2Sim_Blender add-on:
Download Pose2Sim_Blender.zip -
Install the add-on in Blender
- Open Blender -> Edit -> Preferences -> Add-ons -> Down arrow to the upper-right corner -> Install from Disk... -> Choose Pose2Sim_Blender.zip
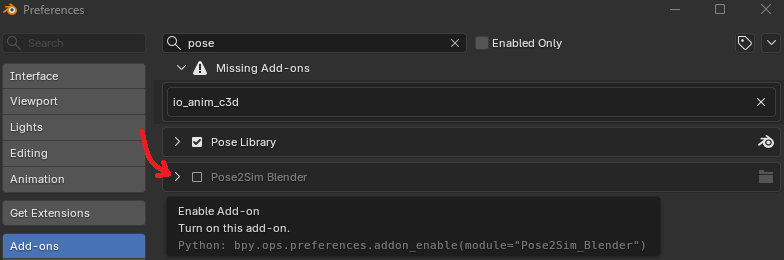
- Check
Pose2Sim Blenderto enable it - Press
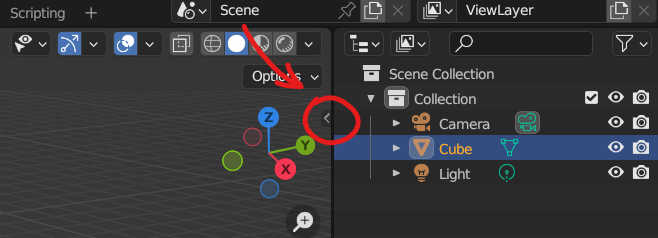
nor Click on the tiny arrow on the upper-right corner of the 3D viewport to open the tool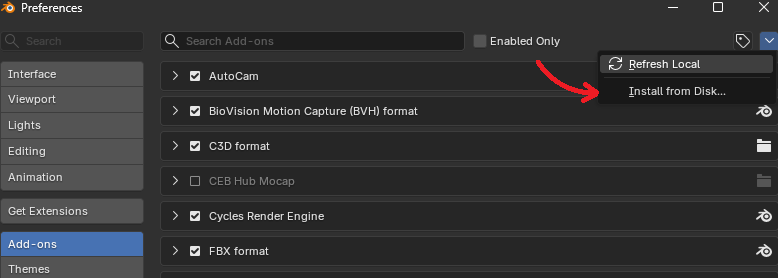
- Open Blender -> Edit -> Preferences -> Add-ons -> Down arrow to the upper-right corner -> Install from Disk... -> Choose Pose2Sim_Blender.zip
⚠️ Warning:
It might take a few minutes to install, as all the required dependencies will be installed in the background.
Demonstration
📝 Note:
Find example files in the Examples folder of your Pose2Sim_Blender.zip archive.
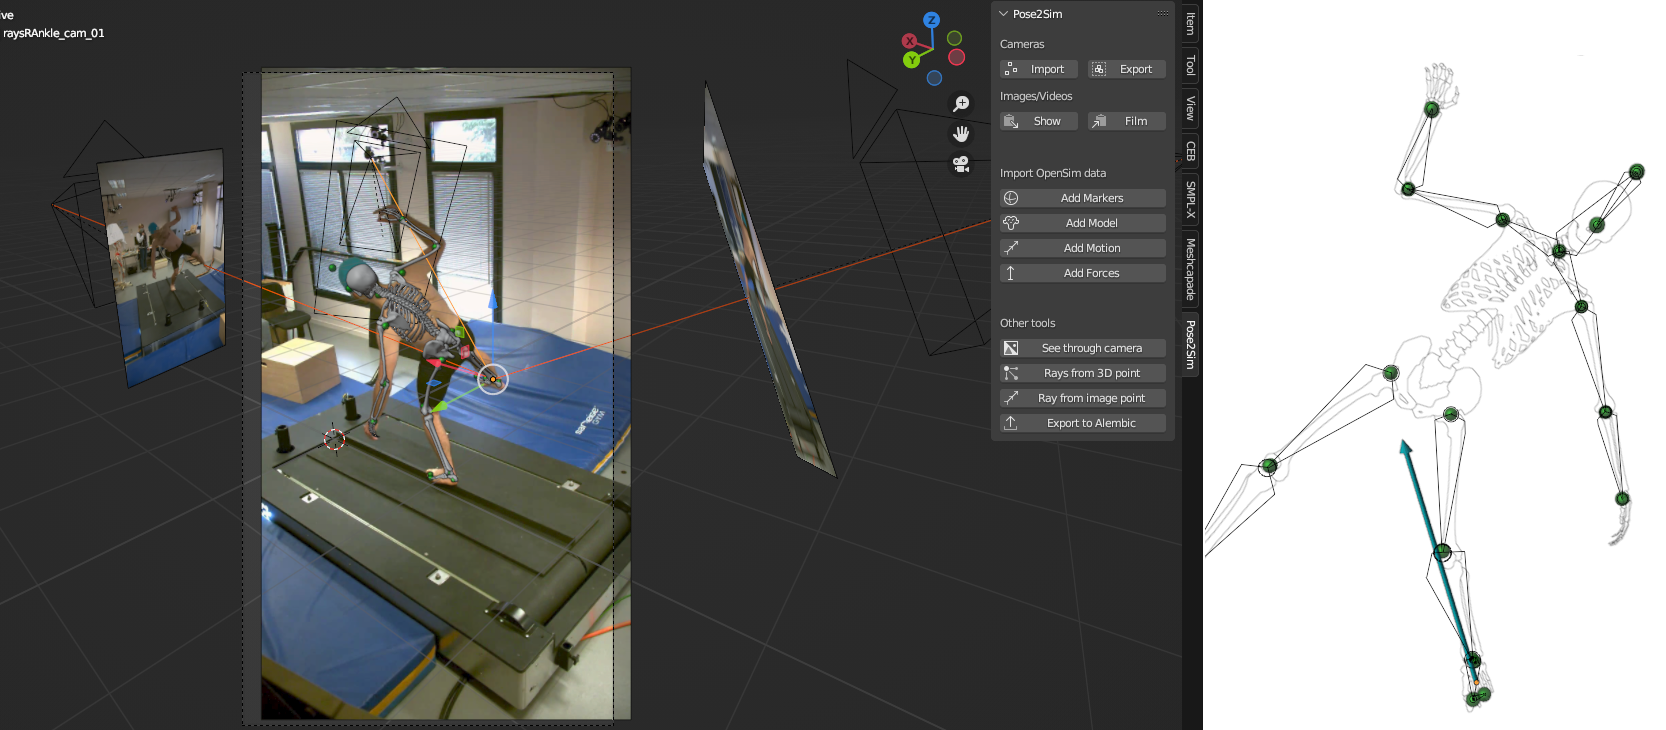
Camera tools#
- Import:
Import a.tomlcalibration file from Pose2Sim. - Export:
Export updated cameras as a.tomlcalibration file. - Show:
Import videos, image sequences, or still images in your camera frame of reference.
The image plane is automatically scaled when translated.
You can optionally chose a frame_offset different from 0. - Film:
Render view from all or selected cameras, as a movie or an image sequence.
Choose your framerate, the first and last frame to be rendered, and the output quality.
OpenSim imports#
N.B.: Make sure you entered the right Target framerate (upper right corner).
- Import Markers:
Import a.trcor a.c3dmarker file, e.g., generated by Pose2Sim triangulation.
You can choose the type of skeleton to be created in order to rig your character from the markers (c3d rig not supported yet). - Import Model:
Import the "bodies" of an.osimmodel.
You can set a custom Geometry path if needed..vtpfiles will automatically be converted to.stl. - Import Motion:
Import a.motor a.csvmotion file.
Creates a .csv file for faster loading next time. - Import Forces:
Import a.motGRF force file.
Other tools#
- Change color:
Change the color of a selected object or collection. - 3D point motion path:
Visualize the motion path of one or several selected 3D points. - See through camera:
View from selected camera, with overlaid markers and OpenSim skeletons. - Rays from 3D point:
Trace rays from one or several selected 3D points. This can help you verify if a triangulated point correctly meets 2D keypoints on image planes. - Ray from image point:
Coming soon! Trace ray from a point selected on an image plane. This can help you see if rays intersect correctly. - Export to GLB:
Export to an.glbGLB "baked" file, for fast import into other softwares.
How to cite and how to contribute
How to cite#
If you use Pose2Sim_Blender, please cite Pagnon et al., 2022b.
   @Article{Pagnon_2022_JOSS,
    AUTHOR = {Pagnon, David and Domalain, Mathieu and Reveret, Lionel},
    TITLE = {Pose2Sim: An open-source Python package for multiview markerless kinematics},
    JOURNAL = {Journal of Open Source Software},
    YEAR = {2022},
    DOI = {10.21105/joss.04362},
    URL = {https://joss.theoj.org/papers/10.21105/joss.04362}
   }
How to contribute#
💡 Tip:
If you want to contribute to Sports2D or Pose2Sim, please see this issue or join the Discord community!
Here is a to-do list. Feel free to complete it:
- Import data from standard OpenSim data files (.osim, .mot, .trc, grf.mot)
- Import c3d files (borrowed and adapted from io_anim_c3d )
- Save segment position and orientation to .csv files for faster loading of motion next time
- Import multiple persons in the same scene
- Create Example data
- Convert .vtp files to .stl if .stl not found on disk
- Rig from trc markers
- Install OpenSim (for motion .mot files) with a click within the addon (create a venv with the right Python version cf CEB, install OpenSim and the other dependencies)
- Import cameras from .toml calibration file
- Export cameras to .toml calibration file
- Import images, image sequences, and videos in the camera view
- See through camera and overlay model and markers
- Reproject rays from selected 3D points to image view
- Export to .abc Alembic files
- Viewport render to film with selected cameras
- Write documentation
- Create video tutorial
- Switch from Alembic to GLB export
- Change color of object or collection
- Rig from OpenSim model and/or .c3d files
- Trace rays from camera to selected image point
- Import .sto motion and force files